
But it's the same thing, you exclaim. And you'll be right. But only partially. First of all, you should understand that MP4 is not an audio or video compression format, but a media container. It can contain anything - audio, video, subtitles, pictures, metadata. In order to differentiate MP4 files by content type, they began to give them different extensions. An MP4 file that contains only the audio track without DRM protection will have the extension M4A. For protected audio files, the extension will be M4P, and for audiobooks, M4B. But keep in mind that these are just recommendations. Files with the wrong extension are quite common.
1 When conversion is necessary?
So, you already have an MP4 file with an audio track? In this case, you can simply rename it to M4A and read on. In what case might conversion be required? I see two main reasons:
The first is to get rid of the video to significantly reduce the file size. It is understandable, the video takes up most of the file, and leaving it for listening on portable equipment is simply wasteful.
The second reason is converting the audio track using a different codec. Yes, in most cases, an MP4 file contains an audio track in AAC format, but the Apple ecosystem often uses lossless compression in ALAC format. For a mobile device, size is more important, so when switching from ALAC to AAC, the file size can be reduced up to 5 times. Even more difficulties arise if the audio track is compressed with an exotic codec, such as EVRC or MPEG4 ALS. Not every player will be able to play such a file, so the AAC codec will be a good alternative for them.
In general, to solve this problem once and for all, you need a converter that supports most audio codecs used in MP4 files. An alternative solution can be to install universal players on each device. In my opinion, the choice is obvious. To convert all files at once, you need a converter with flexible settings, since the parameters of different codecs may not match. Let's try to consider several options for converting both individual audio files and batch processing of the directory tree.
2 Convert MP4 to M4A Online
This time I decided to break with tradition and try another online service - Online Audio Converter. At first glance, everything looks quite simple and convenient, but the service's capabilities are regrettable. For the M4A format, it is impossible to select a codec, which means you are limited to the AAC codec only. That is, you can forget about lossless compression. Sampling rates are limited to 48000 Hz, which means you can say goodbye to hi-res sound. If you do not know the parameters of the original file, then by choosing the wrong sampling rate you can encounter resampling. Overall, the set of compression settings can be considered very poor.
Among the advanced features, there is the ability to edit metadata, but it is limited to a minimum set of text fields and does not support a picture with a cover. At the same time, it is unclear why the "Reverse" option is present. The "Fade In" and "Fade Out" options can be considered conditionally useful.
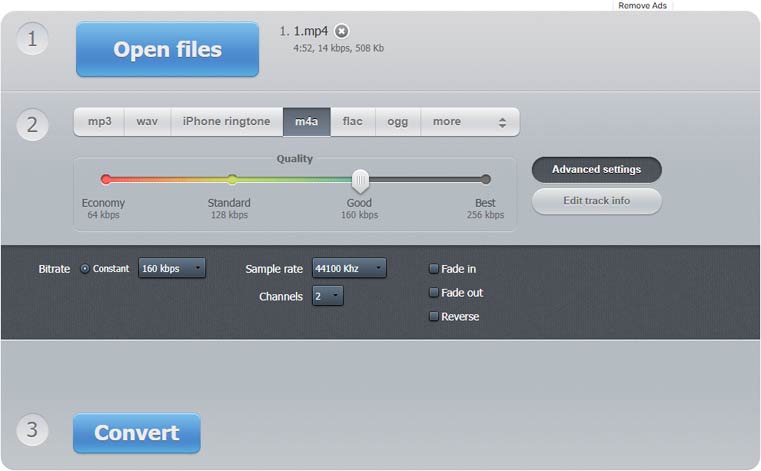
There is hardly any need for user manuals here - you simply upload one or more files, select the output format from a modest list, and after conversion, download the files to your computer.
In general, such features are available in any free converter, but here we are offered to pay 6 euros for a subscription only to increase the limits on the conversion volume. You won't get more options for that money. Based on that, I recommend trying alternatives like Convertio.
3 Turn MP4 into M4A on Windows
Desktop solutions always offer maximum possibilities and customization, for which they are loved. You can simply trust the default settings, and if you have the necessary knowledge, choose them yourself. The speed of desktop and online tools is difficult to compare directly, because it will vary greatly depending on the configuration of your computer and the speed of your online connection. But in general, desktop converters work faster. The last factor is the price. Pay once for the program or pay regularly for a subscription to the service - here you decide. Let's take a closer look at what Audio Converter Plus can do against its competitors.
 Step 1. Download and install software
Download Audio Converter Plus by clicking the "Download" button above. During installation, items for quickly converting both individual files and entire folders will be added to the Explorer context menu.
Step 2. Add MP4 Files to the Conversion ListYou can add individual files or entire folders with video files using "Add File" or "Add Folder" buttons. If you want the converter to add files from the subfolders, then activate this feature in the program settings. Of course, you can just drag and drop files and folders onto the program window.
Step 3. Select the Destination FolderConverted files can be placed in a folder with the original file or in any other folder of your choice. The converter allows you to save the original folder structure.
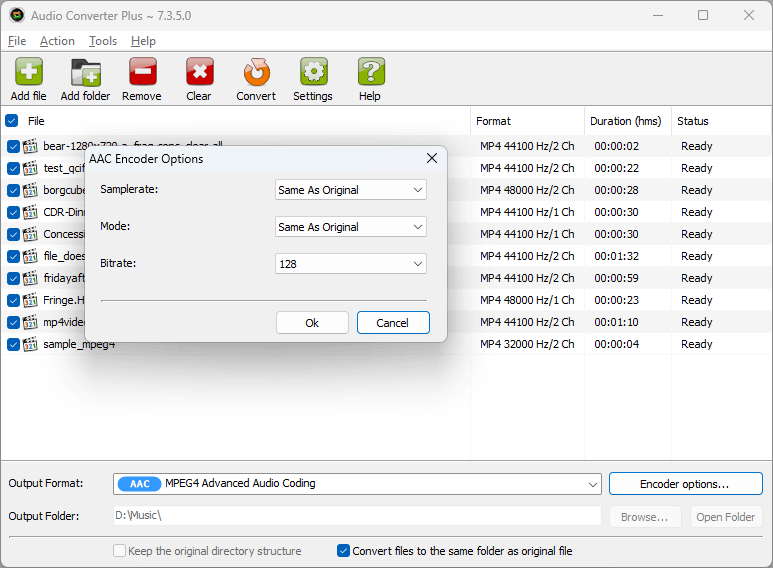
Step 4. Select the Compression OptionsSelect the AAC or ALAC format from the list and click Encoder options. Use the "Same as original" option to keep the original MP4 audio compression settings or set your own sample rate and bitrate.
This is the choice I talked about at the beginning of this article. If most of your files contain high quality music, extra conversion is not good for it, so try to keep the original sample rate. If it is not supported by the output format, the converter will select the closest value. For a motley collection of voice recordings, fixed output parameters and an additional volume normalization setting are more suitable.
Step 5. Additional OptionsOf the additional functions, you may find the ability to copy tags and save the file creation date useful. Since conversion is taking place, it would be nice to normalize the volume of all files. This option is also available.
Step 6. Start ConvertingNow you are ready to begin the conversion. Click on the "Convert" button and you can do your own business. At the end of the process, you will see a flashing icon on the taskbar.
4 Conclusion
In general, you should not have any problems with conversion, since the MP4 format and AAC codec are supported on all platforms. Other codecs may require a little more technical knowledge. The worst case scenario you can encounter is a DRM-protected file. Here, a regular converter will not help, and if you do not have the rights to play the file on your device, then specialized utilities will also be powerless. If the file is playable, you can try to re-record it using an audio recorder.