When you record streaming audio or digitize old cassette tapes, the result is often one large file containing several songs or segments. In some ways, this is convenient, and was once the way to store copies of CDs along with a CUE file containing information about individual songs. But now, combining all the tracks into one file makes it more difficult to organize your media library. For transferring music to portable players or downloading cloud services, it is more convenient to store them separately.
Luckily, there are several effective methods for splitting long recordings into individual tracks, either during the recording process itself or afterward using an audio editor. In this guide, we will look at how to effectively split audio recordings, which will help you preserve quality while making your collection more manageable.
1 Why Track Splitting Matters
Splitting a long recording into separate tracks transforms a continuous stream of audio into a structured, easy-to-navigate set of files. This is especially important when archiving when recording streaming audio, when it is desirable to store songs from different artists in different folders.
Without splitting, you lose the ability to:
- Tagging and properly organizing your collection. CUE files can be convenient for an album of one artist, but their ability to store metadata is not comparable to modern ID3 tags.
- Transfer content to devices and cloud services. If you are only interested in one song, then copying an entire album in one file seems too wasteful.
- Convenient navigation. Not all devices allow you to organize navigation within a single file. This can be done with audiobooks, but I have not yet encountered such capabilities for music.
- Convenient editing. Really, loading a huge file into an audio editor to slightly change one song, and then saving the entire album again. This is not at all what I need.
In general, we can conclude that storing all tracks in a separate file may be acceptable only for archiving, but in everyday life, separate files are more practical.
2 Split recordings in real time with i-Sound Recorder
One of the most time-saving approaches is to split tracks during the recording process itself. This method works especially well when recording from analog sources like cassette decks or turntables, where clear pauses between songs help identify track boundaries.

Using i-Sound Recorder, you can enable the sound-activated recording mode , which detects natural silences between tracks and automatically creates new files at each break. This eliminates the need for post-recording editing and ensures clean separation right from the start.
To use this feature effectively:
- Set the silence threshold so the recorder doesn’t mistake soft passages for gaps.
- Adjust the pause delay to avoid premature track cuts during short breaks within a song.
- Ensure consistent spacing between tracks — especially useful when transferring LPs or mixtapes.
While this technique works exceptionally well for tape transfers and live recordings with clear pauses , it may not be as reliable for modern radio streams or DJ sets, where songs often transition seamlessly without silence.
When using lossy codecs, this method is definitely worth considering, since splitting the recording in the editor will require re-compression, and therefore will lead to a loss of quality.3 Automatic splitting in WaveCut Audio Editor
If you already have a full recording and missed the chance to split tracks during capture, don't worry — you can still automate the process afterward using powerful tools like WaveCut Audio Editor .
WaveCut offers a built-in automatic audio splitter that analyzes your waveform and separates tracks based on predefined settings.

Once the software identifies the track boundaries, it loads each segment into its own window, allowing you to preview, edit, or fine-tune before saving. This method is ideal for users who prefer automation but still want flexibility in how their final tracks are handled.
This kind of smart splitting is especially helpful for:
- Podcasters dealing with multi-segment interviews
- Educators organizing lecture recordings
- DJs or musicians archiving live sets
By using automatic detection, you save hours of manual work and ensure a consistent, professional output.
4 Manual splitting in Wave Editor
For those who demand the highest level of accuracy — or when automatic methods fall short — manual track splitting gives you full control over where each cut occurs. Although more time-consuming, this method allows you to visually inspect the waveform and make precise edits based on musical transitions, speech cues, or known track lengths.
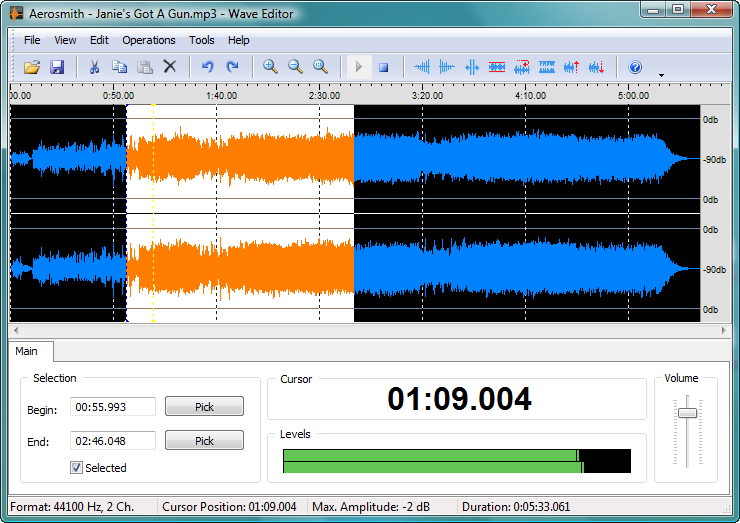
In our free audio editor, you can zoom in on the waveform, listen carefully to transitions, and mark the boundary of each track yourself. If you know the exact time of each song or segment, you can even manually enter the start and end times.
Here’s how it works:
- Open your full-length recording in the editor.
- Use the waveform display to locate track changes.
- Select the desired section and choose “Save Selected As…” to export it as a standalone file.
Manual splitting is particularly useful when dealing with recordings that lack clear pauses or contain overlapping content — such as live performances or spoken word material with minimal silence between sections. While it requires more effort, the results are often cleaner and more accurate than automated methods — especially when preparing files for archival or professional distribution.
5 Best Practices
When you're splitting recordings, it's really important to keep the audio quality high. One of the best ways to avoid quality degradation is to use lossless formats when you're editing.
We'd say FLAC is pretty much the go-to for intermediate editing, as you don't have to worry about losing anything during re-encoding. FLAC files are bigger than compressed formats like MP3, but still smaller than uncompressed WAV. Best to convert to MP3 or AAC as a final step, once you've finished splitting and editing.
When you split a file into tracks, you'll need to add the artist names, album titles and track numbers yourself. You can use any tag editor you like, but I'd suggest ID3 Tag Editor as it can automatically recognise the artist and song title.
6 Conclusion
If you're dealing with old tapes, recording live stuff or getting your voice memos in order, being able to split recordings into separate tracks is a real asset. Whether you're into real-time splitting with i-Sound Recorder or you're more of a hands-on kind of person, WaveCut Audio Editor has got you covered.
Automatic detection saves time and effort, while manual splitting makes sure you get accuracy and quality, especially when working with complex or seamless recordings.
If you pick the right method for your needs and stick with lossless formats when you're editing, you can easily turn a long, disorganised audio file into a polished, track-separated collection that's ready for listening, sharing or archiving.
So, if you're struggling with a big audio file, don't stress! Just split it up and sort your digital library.