Want to know how to get rid of background noise in audio recordings? Here is a simple and highly effective way to remove noise in the WaveCut Audio Editor. Whether you recorded the audio yourself or received a file from someone else, dealing with background noise is always a challenge. Recording in a professional studio may not be feasible for everyone, and even in such controlled environments, there's still the issue of microphone and electronic noise.
Before we continue, I want to caution that it is always better to minimize noise during the recording process than to remove it algorithmically. The fact is that the noise reduction algorithms themselves introduce their own distortions. Unfortunately, there are many situations where noise cannot be avoided, such as when conducting street interviews or when restoring old recordings that contain tape or vinyl noise.
The good news is that most audio editing programs have built-in tools for reducing background noise. These tools, depending on the imagination of the developer, are called "Noise Reduction", "Noise Removal" or "Noise Suppression". They provide a quick and easy way to clear various types of noise from your recordings.

I'll show you how to get rid of background noise using pattern-based spectral subtraction. Such filters are available in many programs, even in the popular open source editor - Audacity. However, their results differ significantly. The free versions use outdated algorithms that introduce noticeable FFT transformation artifacts. In this article, I will focus on a modern and sophisticated noise reduction feature recently introduced in WaveCut. This tool is free from the common issues found in other tools, such as the notorious "under water" effect.
1 What is noise profile?
First, let's talk about what a noise profile (or pattern) is and how to obtain it. In order for a filter to effectively remove noise from your audio recording, it must be able to recognize what "noise" actually sounds like.
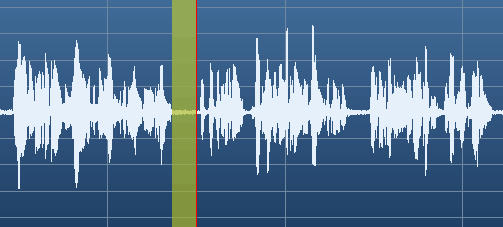
To create a noise profile, you need to find a section of the recording where there is no voice, no music, or anything of value other than background noise. If you're just getting ready to start recording, it's easy to capture a few seconds of silence at the beginning of your recording session. The main goal of this step is to obtain an audio sample that contains only the ambient noise present in your environment.
During this time, it is important to avoid any activities that may cause random noise, such as breathing into a microphone or a chair squeaking. It's better to turn away from the microphone altogether. This ensures that the recorded sample contains exactly the background noise in your room.
Once you have this sample of uniform noise, you can use it as a reference for a filter to identify and suppress similar noise throughout the rest of your recording. This is the concept of a noise profile.

If you are removing noise from a finished recording, you need to look for quiet pauses between individual words or areas at the end or beginning of the track where there is no useful signal. The longer the noise area you isolate, the more accurate the profile you will get. It is also important that in the selected area there are no separate impacts or extraneous sounds other than background noise.
And most importantly, never highlight any part of the voice or music at this stage. It is better to remove less noise than to remove the desired signal. This section of the recording with noise is called a "fingerprint" or "noise profile". The sound editor calculates the spectrum of the noise signal and determines which frequencies need to be removed from the recording.
2 Creating a noise profile
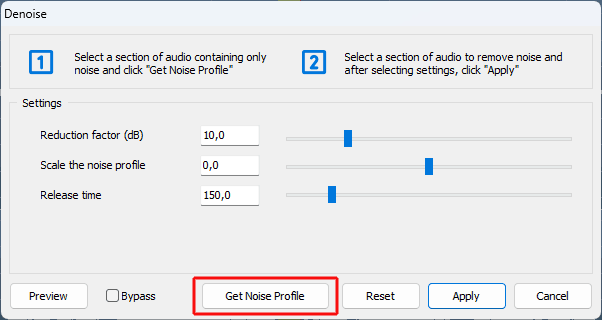
Once you've isolated an area of ONLY background noise, it's time to hand it over to the editor to process it.

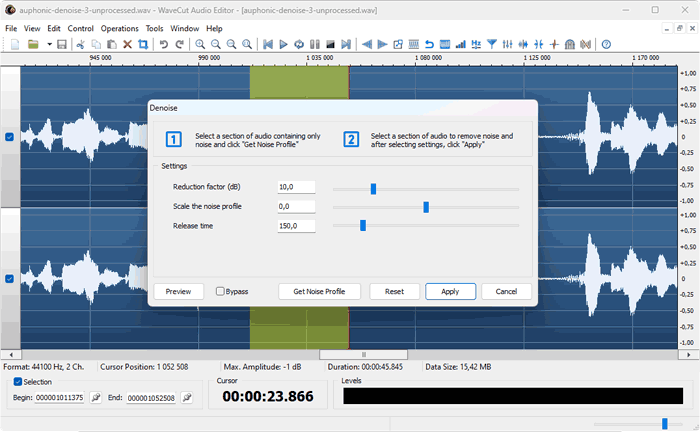
Click "Operations" in the editor menu. Select "Denoiser" from the drop-down list. In the window that appears, click the button labeled "Get noise profile". Once you click "Get Noise Profile", the noise reduction window will close. This means that the editor has now processed the noise and is ready to remove it. Noise profiles are created independently for each open file and do not interfere with each other. If you are not satisfied with the result of noise removal, you can always try to choose a new pattern by highlighting another area of noise in the recording.
3 Applying Noise Reduction
It's time to start removing noise, but first you need to select all your audio. So click on "Edit" in the main menu and then select "Select All" from the menu. The standard "Ctrl-A" also works. You can also just double-click anywhere in the audio file. Whatever you do, make sure you cover the entire area you want to remove the noise from.
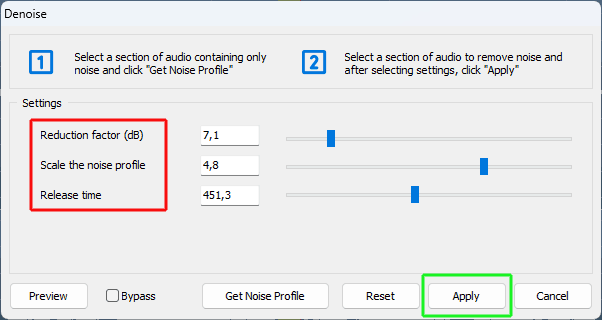
Now open Noise Reduction (Operations/Denoiser) again. This time you can select filter settings. To do this, you can turn on the "Preview" mode and listen in real time to how these settings affect the result.

Reduction factor: Determines how much the noise level is reduced. Increasing the coefficient increases the distortion introduced by the filter.
Scale the noise profile: larger values will reduce more noise by removing low-level signal details. It helps a lot if you couldn't get a long section with pure noise.
Release Time: Minimum time to apply the reduction. Larger values will reduce artifacts, but may blur nearby transients.
When the settings are selected, feel free to click "Apply" and wait for the filter to finish working.
4 Final Tips
For best results, the noise should not be too loud initially. If there is too much noise, it will be very difficult for the filter to separate the noise from the useful sound - music, vocals, regardless of what you recorded.
Don't try to remove as much noise as possible in one pass. You can achieve better results by applying the noise reduction effect several times with more delicate settings. Of course, the noise profile must be obtained anew for each pass.
If the noise varies greatly from one section of the audio recording to the next, apply a different reduction for each section.
If the background noise is constant, consistent and not too loud compared to the voice, noise cancellation should work perfectly and introduce minimal distortion.
