
Surely many of you have stored old recordings on audio cassettes. Alas, nowadays audio cassettes are far behind in all respects compared to modern media players. But old cassettes evoke fond memories and it would be a shame to lose them. The best way to preserve old tapes would be to digitize them into MP3s.
Digital remastering requires a lot of expensive equipment, software and highly trained personnel. Can it be done at home on a computer? Let's give it a try. In this example, we'll go through the step-by-step procedure of recording from an audio cassette directly to MP3. Hopefully your cassette player is still working?
1 Preparing the Connections
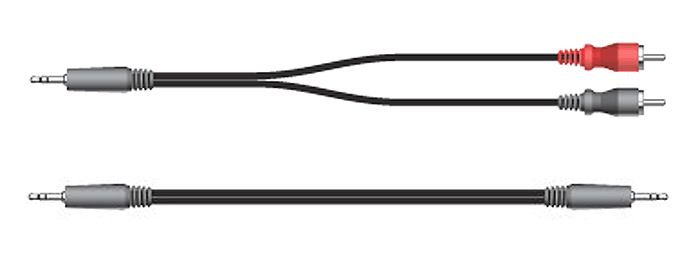
If you are connecting a cable to a stationary deck or receiver, you will most likely need a cable with two RCA connectors. For portable recorders and players, a regular AUX cable with 3.5mm jacks will do. Exotic variants with SCART-connectors on the player output and balanced inputs of professional audio interfaces are beyond the scope of this article.
The connection should not cause any problems either. The line output of the tape recorder is connected to the line input of the sound card. Of course, in some cases these connectors may not be available. Then you'll have to improvise - use the tape recorder output to the headphones or the microphone input of the sound card.
2 Choosing the Optimal Settings
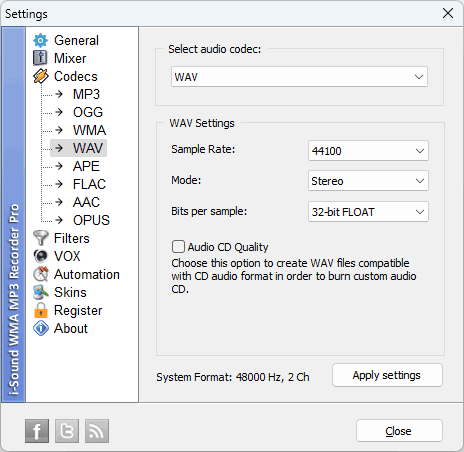
First of all, let's define the recording parameters. Despite the fact that we are going to save the audio in MP3 format, immediately after recording we will need additional sound processing, which means that it is better to use uncompressed intermediate format. The number of channels is simple, almost all recordings are made in stereo mode. The 32-bit floating point bit depth will help us to avoid clipping even with wrongly chosen recording level. The last and most important parameter is the sampling rate. Since the best cassette decks do not reproduce frequencies higher than 20KHz, according to Nyquist's theorem, the sampling frequency should be around 40KHz. The closest standard frequency of 44100Hz will provide a small margin and allow most neural networks to be used to improve sound quality.
3 Recording Audio from a Cassette Tape
Once the connection is established, I recommend following the instructions in this article on how to route the audio from the line input to the speakers so that you can control the digitization process by ear.
Now we need an audio recorder that has an auto-stop and allows you to control the recording level. In addition, it is desirable to have a function of sound activation of recording and noise filtering. The standard Windows recorder does not have these functions, so I suggest using i-Sound Recorder.

i-Sound Recorder Benefits
- Record audio from Line-In and Microphone
- Real-time hiss and hum filtering
- Record in 32-bit floating point format to avoid clipping
- Music recognition and auto-tagging
After downloading and installing the recorder, launch it and open the settings window. On the "Mixer" tab, select the recording source - "Line-In" and start playback in your cassette player. If everything is connected correctly, you will see the recording level on the recorder's VU-meter. Using the player's volume control and the recorder's VU-meter adjust the recording level to about 50-70% of maximum.
Now you can set the selected intermediate format. Open the "Codecs" tab, select WAV format, 44100Hz, Stereo, 32-bit float. By the way, you can just select Audio CD mode, which will set a similar format by itself, but with 16-bit depth.
I'm not going to write about noise reduction settings and automatic splitting of the recording into separate songs to demonstrate the processing of the recording in the audio editor. However, you can read about these functions in the recorder's documentation and use them at your discretion.
All that remains is to rewind the tape to the beginning, start recording in the recorder and playback in the cassette player.
4 Removing Tape Hiss
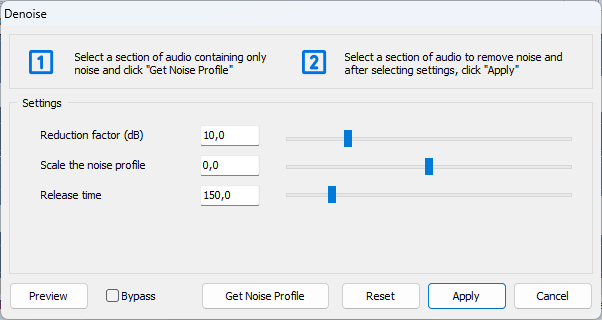
So, we got one big file of 45 minutes for one side of the cassette. Even if you are a lucky owner of a Nakamichi deck and Type IV metal cassettes, you cannot avoid the tape's own noise. It is with noise removal that we will begin. Simple methods with low-pass and high-pass filters are not effective enough, but noise reduction with noise fingerprinting is perfect. It's easy to get the tape's own noise at the beginning of the tape or in between individual songs. Most importantly, it remains constant throughout the recording, which means it can be removed in a single pass. For step-by-step instructions, see our post on removing noise from audio recordings.
Before proceeding, I would suggest normalizing so that all songs on the album have the same volume.
5 Splitting into Individual Songs
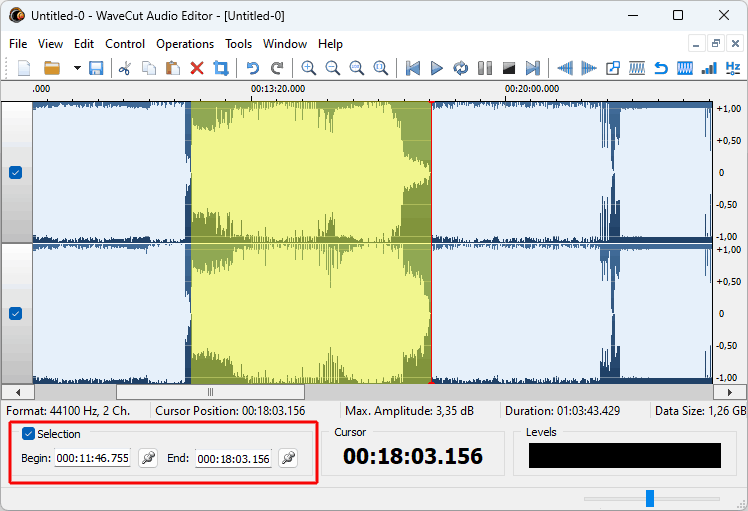
At the final stage we already have enough quality sound and it remains only to split the file into separate songs. This is easy enough to do in any audio editor. Since I did the noise removal in WaveCut Audio Editor, I will do the song splitting in WaveCut Audio Editor as well. To do this, I find the pauses between songs while listening, click the “Pick” button on the panel highlighted with a red frame on the screenshot to memorize the position, and then click the “Selection” checkbox to select a separate song. After that I open the “File” menu and select “Save selected as...”. In this final step, you can save your songs in MP3 format. In my opinion, a bitrate of 160 kbps will be sufficient for cassette recordings.
Alternatively, you can leave the whole recording as a single file and create a CUE-file, which contains timestamps and titles of individual songs.
6 Tagging Your Files
After conversion, open the MP3 files in ID3 Tag Editor and fill in the metadata of your songs. If it is a well-known artist, you can try clicking "Identify", after which the song will be automatically recognized and the information will be downloaded. For amateur recordings, manually mark:
- Artist names
- Song titles
- Album information
- Year and genre (if you remember them)
This is a minimal set of fields that simplifies song search and allows you to organize your collection, especially if you archive dozens of tapes.
7 Conclusion
So we did it. What 20 years ago required an audio studio is now quite easily done on an ordinary computer, and the maximum cost will not exceed $50 for a set of software and connecting cables.
In case the quality of recordings has degraded a lot, simple noise reduction will not be enough. Most likely, music recordings cannot be restored, but for voice recordings everything is not so bad. Modern neural networks can work wonders and extract intelligible speech from the most damaged and noisy recordings. But this is the subject of another article.