Recording your voice along with music doesn’t have to mean stepping into a professional studio or buying expensive gear. Whether you're creating a YouTube cover, a TikTok duet, or even a podcast-style narration over background tracks, it’s totally doable on a regular Windows PC — as long as you know how to set things up. The trick is mixing two audio sources in real time: the music from your computer and your live microphone input. While this might sound like something only pros can pull off, modern tools make it easy — and best of all, you don’t need fancy software or deep technical knowledge. Let’s walk through how to record both music and voice together using simple steps and free or affordable tools.
1 Why You’d Want to Mix Music and Voice
There are tons of reasons why someone would want to combine these two streams:
- Singing over a backing track
- Making a voiceover for a video
- Recording commentary while playing games
- Creating karaoke-style recordings
- Doing vocal practice with instrumental loops
In each case, the goal is the same: capture your voice clearly while letting the music play alongside it — not one after the other, but together in real time.
And the good news? Your PC already has everything you need to do this — including the right software mixer and sound card support. You just have to use them the right way.
2 What You’ll Need Before You Start
Before diving into the actual recording process, make sure you’ve got the basics covered. You'll need:
A working microphoneIf you're serious, you'll already have a decent mic and a pop filter, but a USB headset will do for casual use. Just make sure the mic is away from the speakers. This is because it can create a feedback loop, leading to undesirable sounds like squeals, hums, and whines.
A decent media player to play your backing trackI'm sure there will be no difficulty at this stage. You can use any media player, such as Winamp, Windows Media Player, AudioRetoucher or others. It would be nice if your media player could slow down the music or change its pitch to create simple effects. But you'll figure that out later.
A sound card that supports loopback or stereo mixThe sound card affects the quality of your voice recording, but much less than the microphone. It is more important that the card supports the "Stereo Mix" function if you are working on older OS. All modern Microsoft OS support loopback recording from speakers.
A voice recorder app that lets you capture system audio and mic input togetherWhile some older tools like the built-in Windows Voice Recorder won't let you choose the right input source, more advanced programs like i-Sound Recorder or AbyssMedia Streaming Audio Recorder offer full control over what gets recorded — including both your voice and the music playing in the background.
If you’re doing this for fun or learning purposes, you probably don’t need to worry about studio-grade quality. Just clear, usable sound where both your voice and the music come through without distortion or imbalance.
3 Set up the software
First of all, you must start the recorder and select a recording source. On all modern versions of Windows this will be "Speakers". In older versions of Windows, this input was called "Stereo Mix". These settings will allow you to mix the sound from the microphone and the audio player and control the result by ear.
Second, start the audio player and load the backing track. Adjust the playback level.

Check the microphone and adjust the signal level with a VU-meter. Windows allows you to adjust the microphone gain via the Control Panel.
4 Set up the soud card
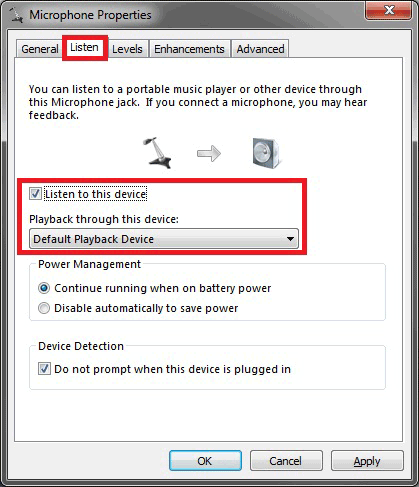
Now the most important step, without which nothing else matters. You need to enable mixing of selected sources at sound card level. Since you can already hear sound from the player, you need to redirect the sound from the microphone to the Speakers. You can read about it at the above link or simply set up the Microphone as shown in the screenshot.
5 Recording Live without Post-Editing
It's time to move from theory to practice. If you've done everything correctly, you'll hear both the music and your voice through your headphones or speakers. Now you can load up your favorite track with background music and say "1, 2, 3, microphone test" in your normal voice. Make a test recording and if you're not happy with the volume balance between your voice and the music, adjust it.
Now you can start recording. When you stop the session, you'll have a single file containing both your voice and the music - no additional editing is required unless you want to tweak the final result.
This method is great for quick YouTube covers, TikTok videos with overlays, home vocal rehearsals, game stream commentary, and podcast intros with theme music.
6 Common Issues and How to Fix Them
Sometimes things don't go as planned the first time. Here are some common problems and how to fix them.
As you can imagine, the main problem will be balancing the levels of your voice and music. The former is controlled by your microphone settings, which were mentioned above. The volume of the music will be adjusted in your audio player. The main thing is not to shake your head in front of the microphone so that the volume of your voice remains constant.
Clipping or distortion occurs when the music or your voice goes beyond 0 dB. Keep an eye on both levels with a VU-meter, especially when you are recording long takes where the levels may vary. Some apps also offer a feature called Automatic Gain Control (AGC), which balances the signal in real time.
If your system no longer supports a stereo mix (which is rare), you may want to consider using feedback recording or installing a virtual sound card like VB-Cable to route the audio correctly.
7 Final Thoughts
Of course, you might say that all this is unnecessary and you can simply mix the voice recording with the background track in a sound editor. And in general, you will be right.
But not everyone has time for post-processing, and sound editing work with a sound editor. After all, for live streaming, you will need exactly the same settings.
Well, when it comes to music, then in the studios the process is almost the same - the artist hears the backing track in the headphones and sings into the microphone. Naturally, in the studios everything is recorded on separate tracks, but for amateur recording or karaoke, this is what you need.
By choosing the right recording software, adjusting the settings of the sound card and microphone and music, you can achieve clean, good-sounding results without leaving your own space.
So don't let technical myths hold you back - with a little setup and the right approach, you can easily record music and voice at the same time and start sharing your content with confidence.